Plenty of readers are feeling the suffocating press of the suburban bell jar right now. We’re being forced to screen the call of the wild just when we want to answer most desperately. For the last half a year, answering has been nigh impossible. Earlier, the regions we wanted to escape to were ablaze and now, civic duty and the boys in the blue hold us back.
As cabin fever gnaws our nerves, the lounge suite begins to feel like the electric chair. But we can make self-isolation more tolerable if we seize it as an opportunity. If you have the funds, now is the perfect time to be decking out your 4x4 for touring — or planning how you’ll go about it — so that when travel restrictions are lifted, you can be on your way instantly.


CHOOSING THE CAR
The vehicle is everything. When we recently set about arranging our own customised touring vehicle, we purchased a second-hand 2011 Mitsubishi Challenger four-wheel drive with a four-cylinder 2.5L turbo-diesel engine, just over 50,000km on the clock, and a service book holier than the Bible itself.
Challengers are among the cheaper models of capable second-hand 4WDs, along with Tritons, Nissan Navaras and Pathfinders, and some Holden Colorados. Second-hand Ford Rangers, Mitsubishi Pajeros, Nissan Patrols, Toyota Hiluxes and LandCruisers tend to be more expensive; you have to take them with tens of thousands more kilometres to get them at the same price.
Admittedly, many of these more expensive models are easier to equip as touring vehicles. That’s simply because they tend to be more popular among the touring community and are mostly still in production, so they have a greater range of accessories purpose-built for them.
We found second-hand utes with tubs tempting because of their higher payload and increased available roof space once a canopy is added. If you go down this path, just be ready to encounter run-down canopies or canopies not reinforced to carry weight up top. You could always buy a tub ute and have a canopy added but that’ll cost thousands and existing tub lids or covers may complicate the job.
Before buying, consider paying for a professional check by RACV or a similar company or mechanic; this may cost $300–400, but that beats your beloved breaking down after you’ve spent thousands accessorising it.
In our view, private sellers tend to be less profit-driven and more aware of a car’s history than second-hand dealerships.
Determine the GVM and dynamic roof carrying capacity of the model in question (check the car book if Google fails you) and add up all weights you’ll be carrying to ensure you will be able to put everything in or on the vehicle without exceeding legal and safe payload.
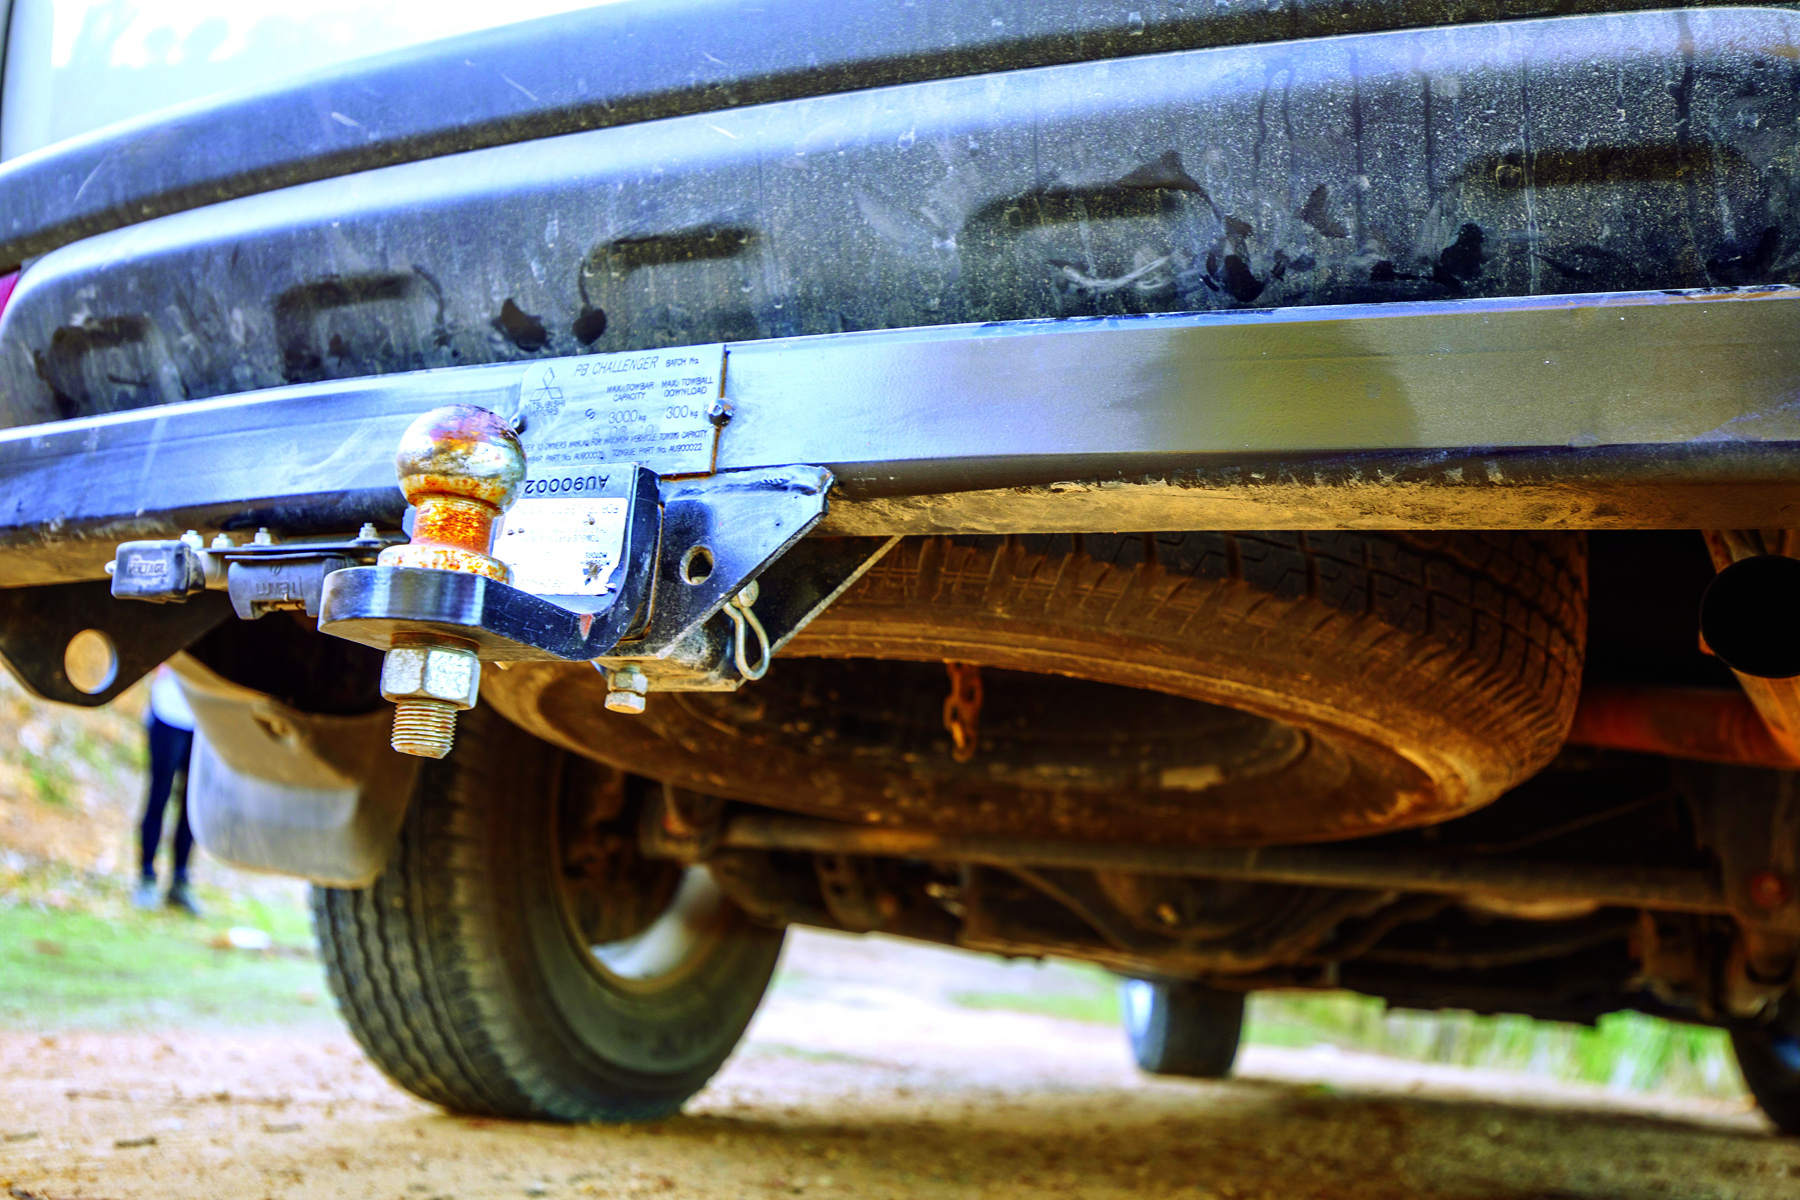
Consider where the spare tyre travels. Our Challenger’s spare travels underneath and must be lowered by a bolt at the bottom of the boot space. This made appropriate storage drawers hard to source, meant we couldn’t hang a bin or MaxTrax on our spare, and rendered installing an auxiliary fuel tank impractical. Unfortunately, relocating spares can be a costly nightmare.
Finally, consider the type and number of accessories fitted to the second-hand vehicle. Accessories may suggest the vehicle was used extensively offroad, not for the grocery run. Also, previous owners are unlikely to have accessorised how you’d like, meaning you’ll be paying for things you’ll get rid of, or be left with an imperfect platform. However, an accessorised car may save you from forking out on new accessories.
PROTECTING THE FRONT
Steel bull bars are stronger, but also a lot heavier than alloy. They tend to weigh 70–100kg, whereas our alloy Big Tube Bullbar from East Coast Bullbars weighs around 45kg — 45 less kilos at the front means better fuel consumption, or seen another way, 45kg more we can carry inside.
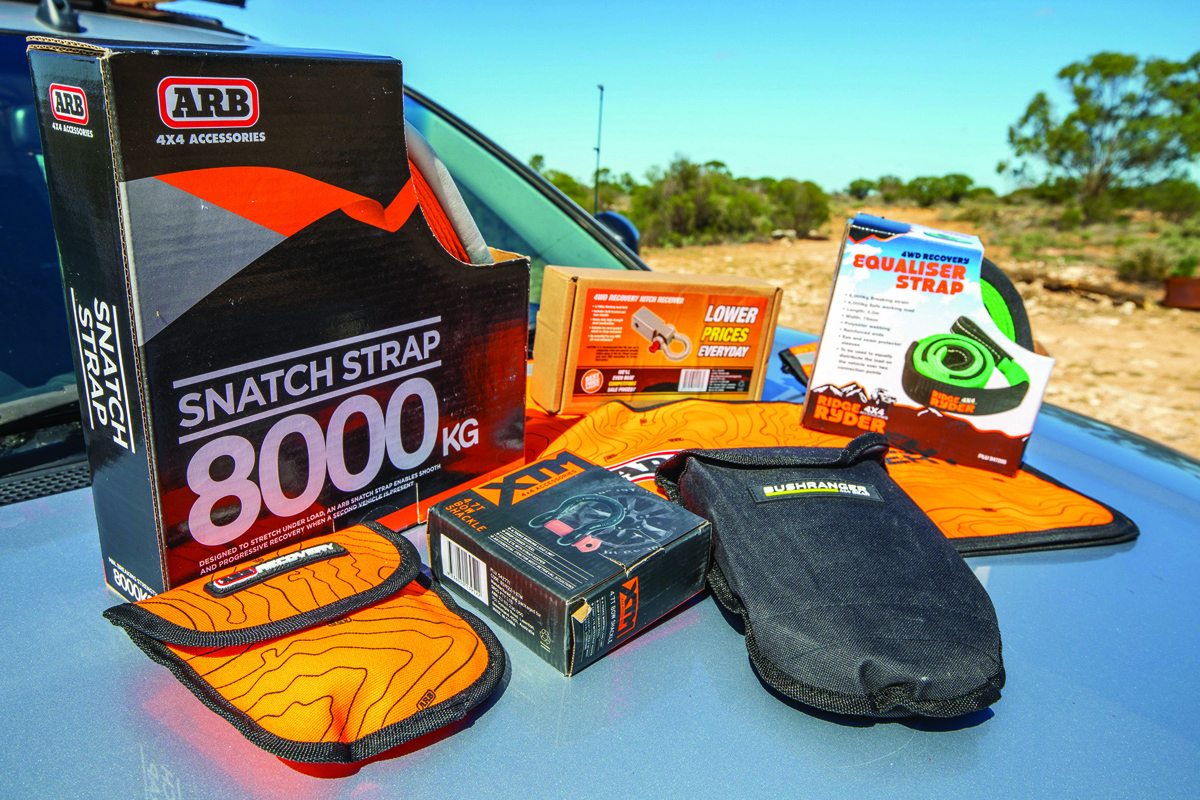
You’ll pay more for alloy ($3000 installed as opposed to around $2000) but you may save by not having to spend on a suspension upgrade, which could cost $2000 again. Most alloy bars do not allow for the addition of winches (which would boost weight yet again), but recovery tracks and snatch straps (for when in convoy) ought to be enough for the moderate offroader.
ECB and Irvin are the main alloy specialists. There are offerings from ARB, Ironman and the like, but these mostly only cater to popular models. Smart Bars are another lightweight choice. You could also consider a steel Xrox bar, which weighs around 45kg; if you go down this path, a lot of your truck’s bumper will be cut off and you won’t have as much frontal protection, but your offroad clearance will be prime.
Make sure your bar allows for the addition of a UHF aerial and spotlights if you plan on installing these. Check if you can drill the bar without voiding warranty.
CREATING ORGANISED STORAGE
Major drawer brands include but are not limited to Drifta Drawers, Gloucester, NSW; Fourbie Fit-outs, Hallam, Vic; Offroad Systems, Sydney; RV Storage Solutions, New Gisborne, Victoria; ARB; and Kings with their Titan Drawers. We ruled out Kings because we wanted our dual battery and drawers done by the same people, so they gelled successfully.
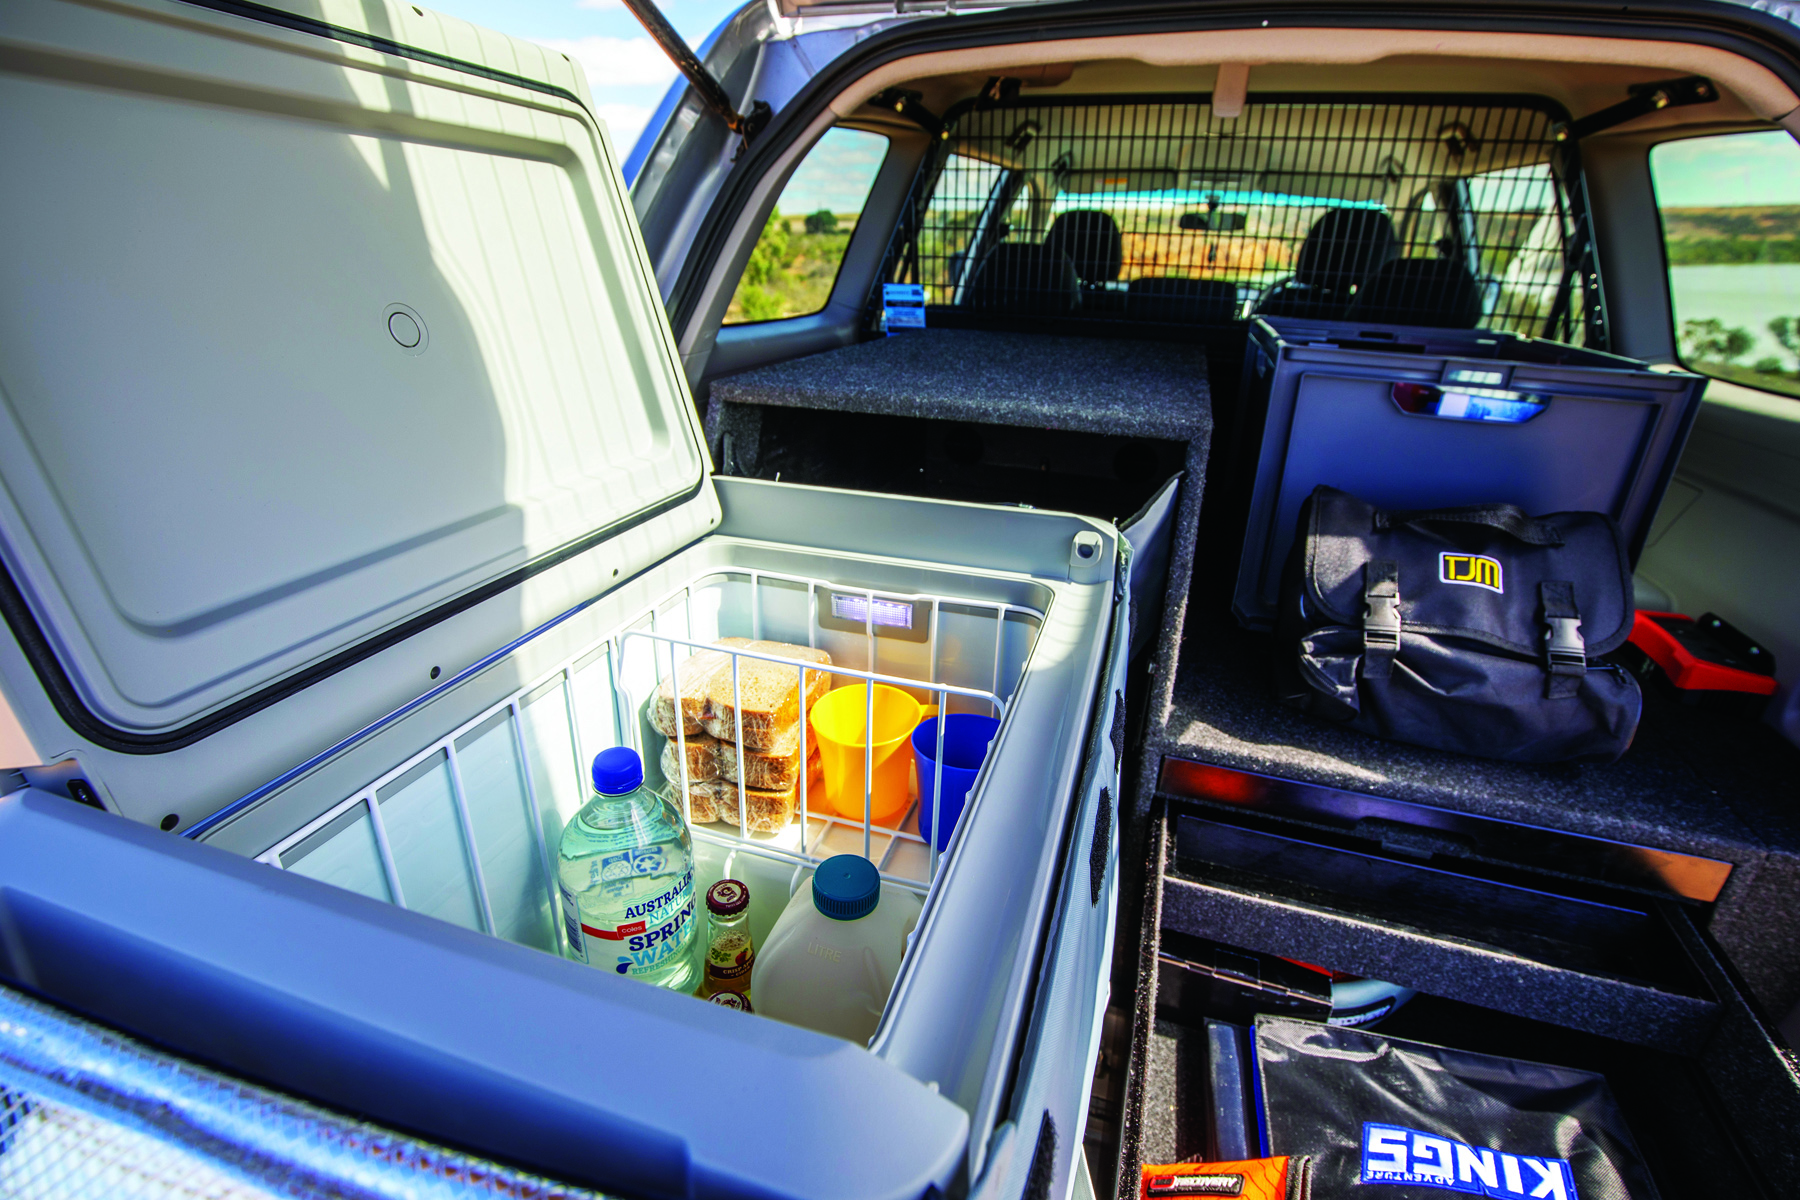
We went with Drifta because of their reputation for quality and ability to customise. As noted, our Challenger is blighted with a spare tyre that travels underneath. While some companies flatly told us ‘no’, Drifta assured us they could tailor the drawers so we could still access the lowering bolt in the boot space.
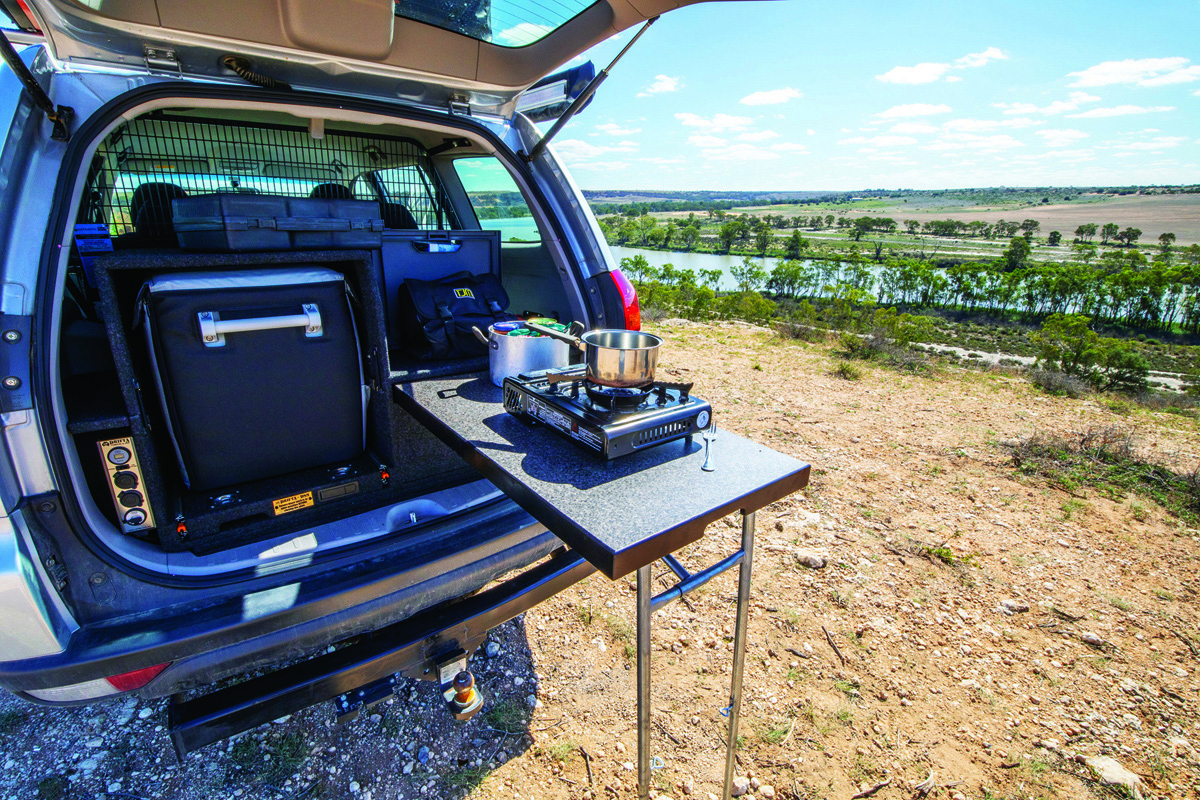
We have a fridge slide on the left, customised by Drifta to suit the dimensions of our Dometic CFF 45L fridge, with a removable frame around it so we can store things on top and slide it out without items falling behind.
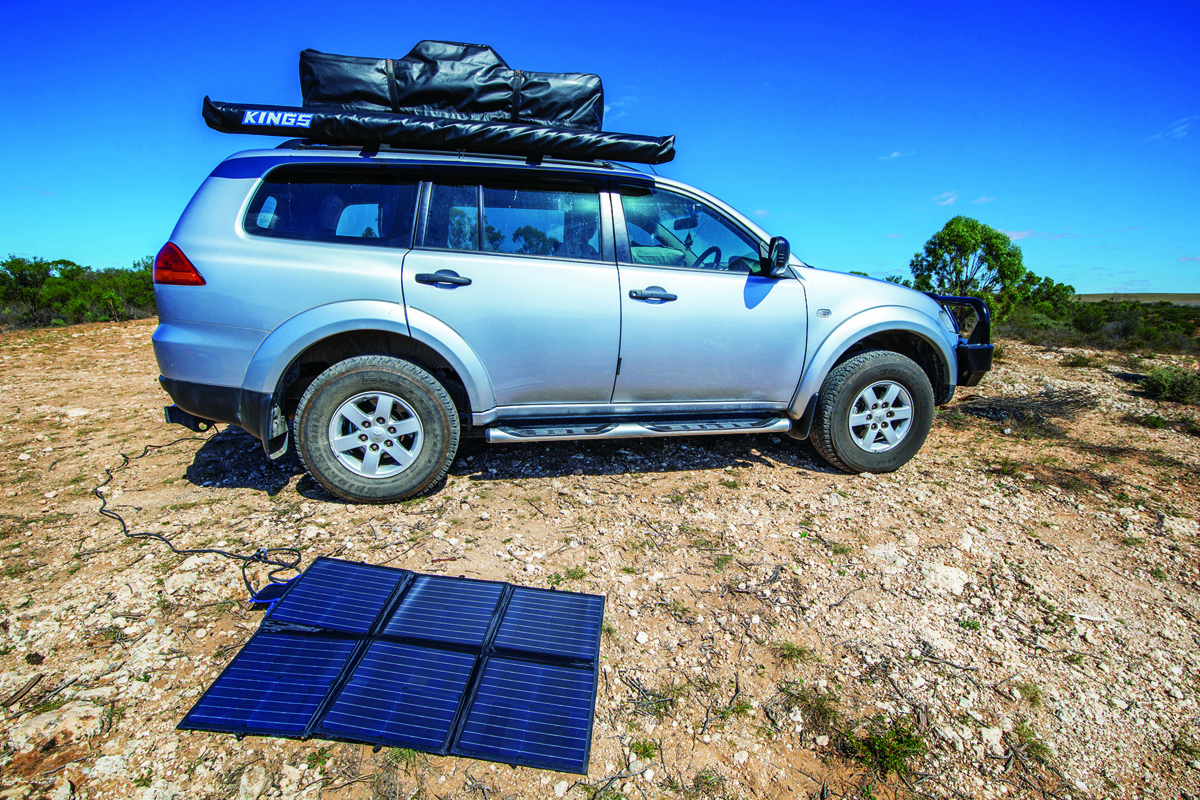
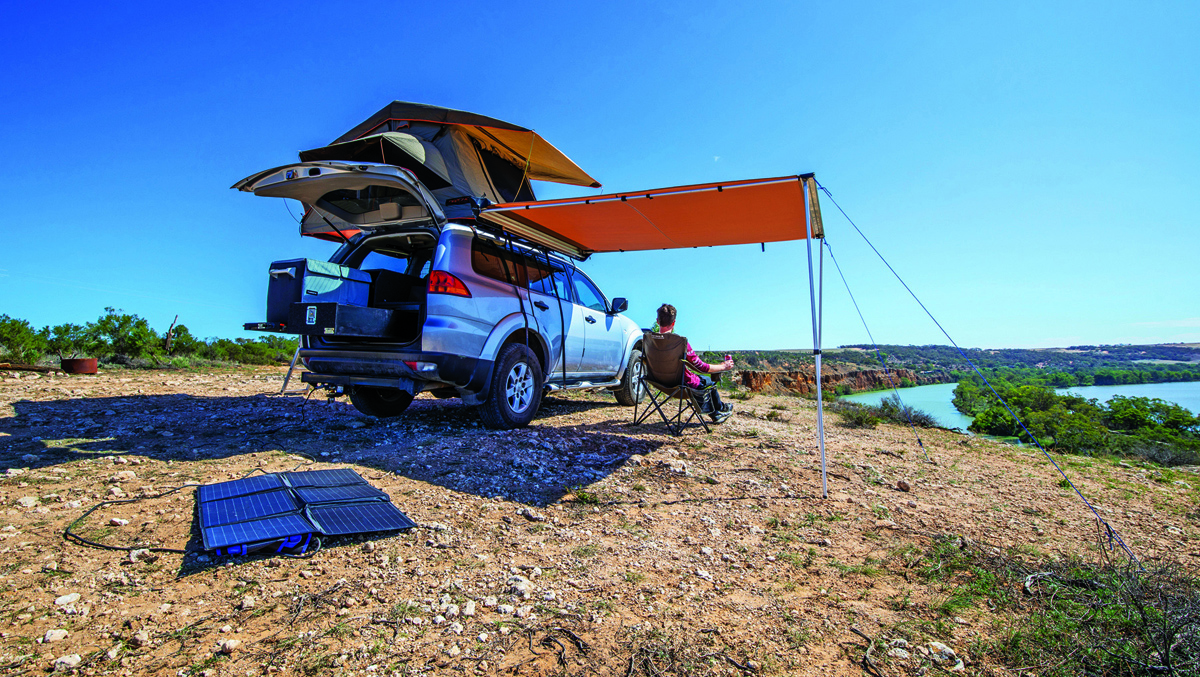
The battery travels at the rear of this and receives charge from the alternator via a REDARC DC/DC charger. This charger also receives input from our 120W Kings foldable solar blanket when this is plugged into an Anderson plug on the tow bar.
On the right there’s a lockable drawer that pulls out the full depth of the boot. In this drawer, there’s one divider and a sliding upper shelf. Above the drawer there’s a slot for an included Drifta table that we’ll use our portable butane stove on.
Down the right side-wing there’s a 600W inverter for charging or operating 240V appliances. Arguably 350W would have sufficed; in hindsight, 600W seems a bit pointlessly in the middle between low and high draw accessories.
The drawers and 12V cost us around $5000 installed, but we’ve been thrilled with Drifta’s work.
PROTECTING THE PASSENGERS
Drifta may also be able to add a KAON cargo barrier over the top of the back seats. However, KAON doesn't make a Challenger barrier so we sourced our cargo barrier separately, prior to the Drifta job, so that Drifta could build their system to suit it.
Milford and Autosafe recurred as the most common cargo barrier options (with honourable mention to Hayman Reese). Both brands are sold through distributors, so detailed information can be hard to come by. The main differences we could infer were that Milford barriers cost more, but are easier to quickly remove. We paid All Vehicle Accessories in Melbourne $700 to supply and install an Autosafe barrier.
It’s a full cargo barrier, meaning it covers the entire boot space from roof to floor, not just the upper half above the seats. This leaves the option of removing the back seats (one side or both) and thereby saving weight and increasing storage space.
Serious tourers may be able to have their barrier installed behind their front seats, but check whether your vehicle’s airbags are compatible with this positioning.
ROOF RACKING
Our Challenger has factory standard roof rails and we hoped we’d be able to add two crossbars worth $350 to these to carry our rooftop tent. However, we were told that in offroad settings, clamp-style roof rail bars may slip and that all roof rack systems ‘derate’ due to the additional strain — such that our 80kg rated rails could only take 66 per cent (53kg) or 50 per cent (40kg) of their quoted allowance.
Ultimately, not wanting to compromise on our roof rack’s strength, we forked out about $1000 to Roof Rack Superstore to have a track-mounted Rhino Rack system drilled in. The roof rails are still there, hidden underneath it all, because getting them off involves removing the car’s interior headlining and is prohibitively expensive.
A roof rack platform is worth considering if you can definitively infer you’ll be able to mount your desired rooftop tent to it; but paying more for one only makes sense if it adds room to store other goods, like MaxTrax or jerry cans. Be wary; loading more weight onto the roof raises your vehicle’s centre of gravity and affects handling.
Before buying your roof rack, decide what rooftop tent you’re after and ensure your desired roof rack system is compatible. Ask, or make your own measurements on display models.
YOUR ACCOMMODATION
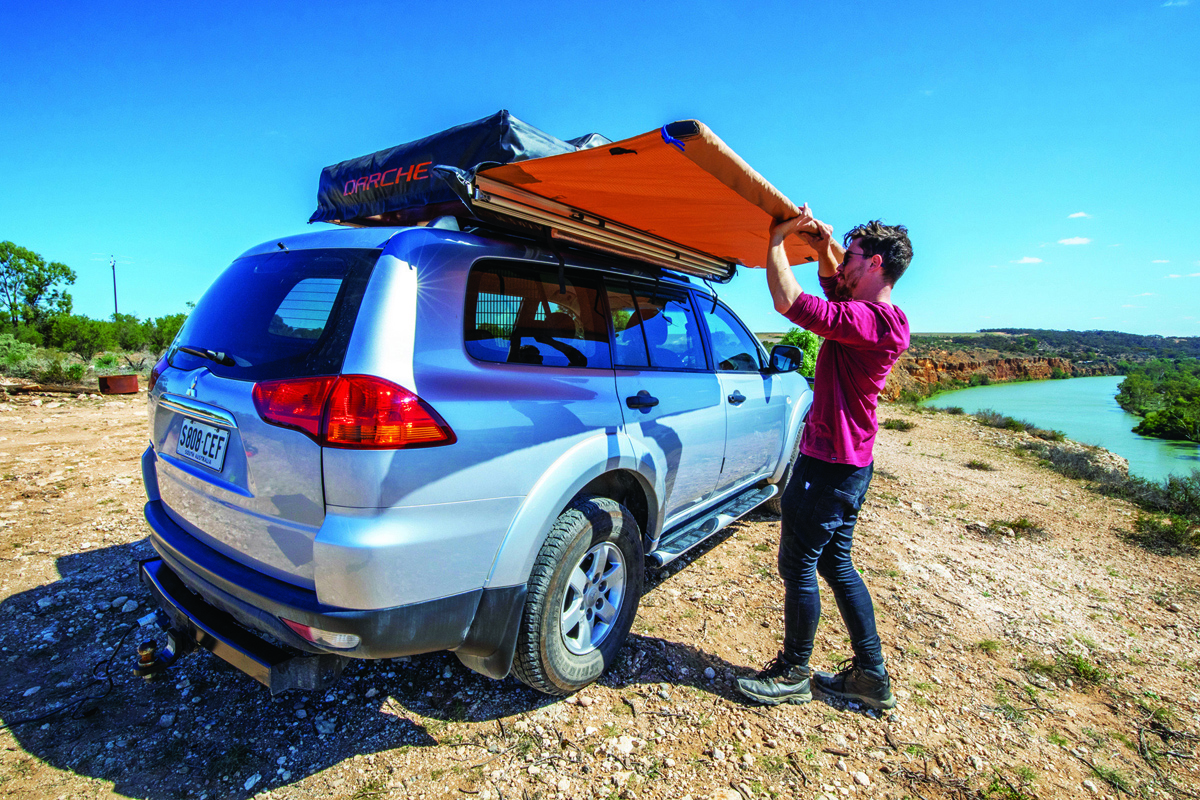
Our Darche Intrepidor 1400 rooftop tent weighs 52kg; we picked it up for $1149 from TentWorld. Other two-person soft-shells weigh a similar amount, while many hard-shells (excluding certain James Baroud and iKamper models) weigh 70–80kg or more. Light tends to be best for balance, fuel economy and remaining within payload limits.
As a general rule, you buy and install a rooftop tent yourself. You’ll need another person or two for lifting it on. The only tools you’re likely to need are a spanner or a ratchet and socket and potentially a screwdriver.
To create outdoor living space we’ve installed a $140 2m Kings Awning with attached LED strip lighting, and purchased a wall that can be attached to any side for shelter. A 270 degree awning increases sheltered space to the maximum but in some cases may pointlessly cover the bonnet or a boot that opens upwards. A 180 degree awning would suit us better but costs hundreds more.
Generally speaking, a roof rack that sits low and close to the roof is best for aerodynamics and balance; however, the difficulty of definitively knowing how your tent and awning will work together in advance may be the one (and perhaps only) argument for getting a roof rack that sits higher.
CARRYING EXTRA WATER AND FUEL
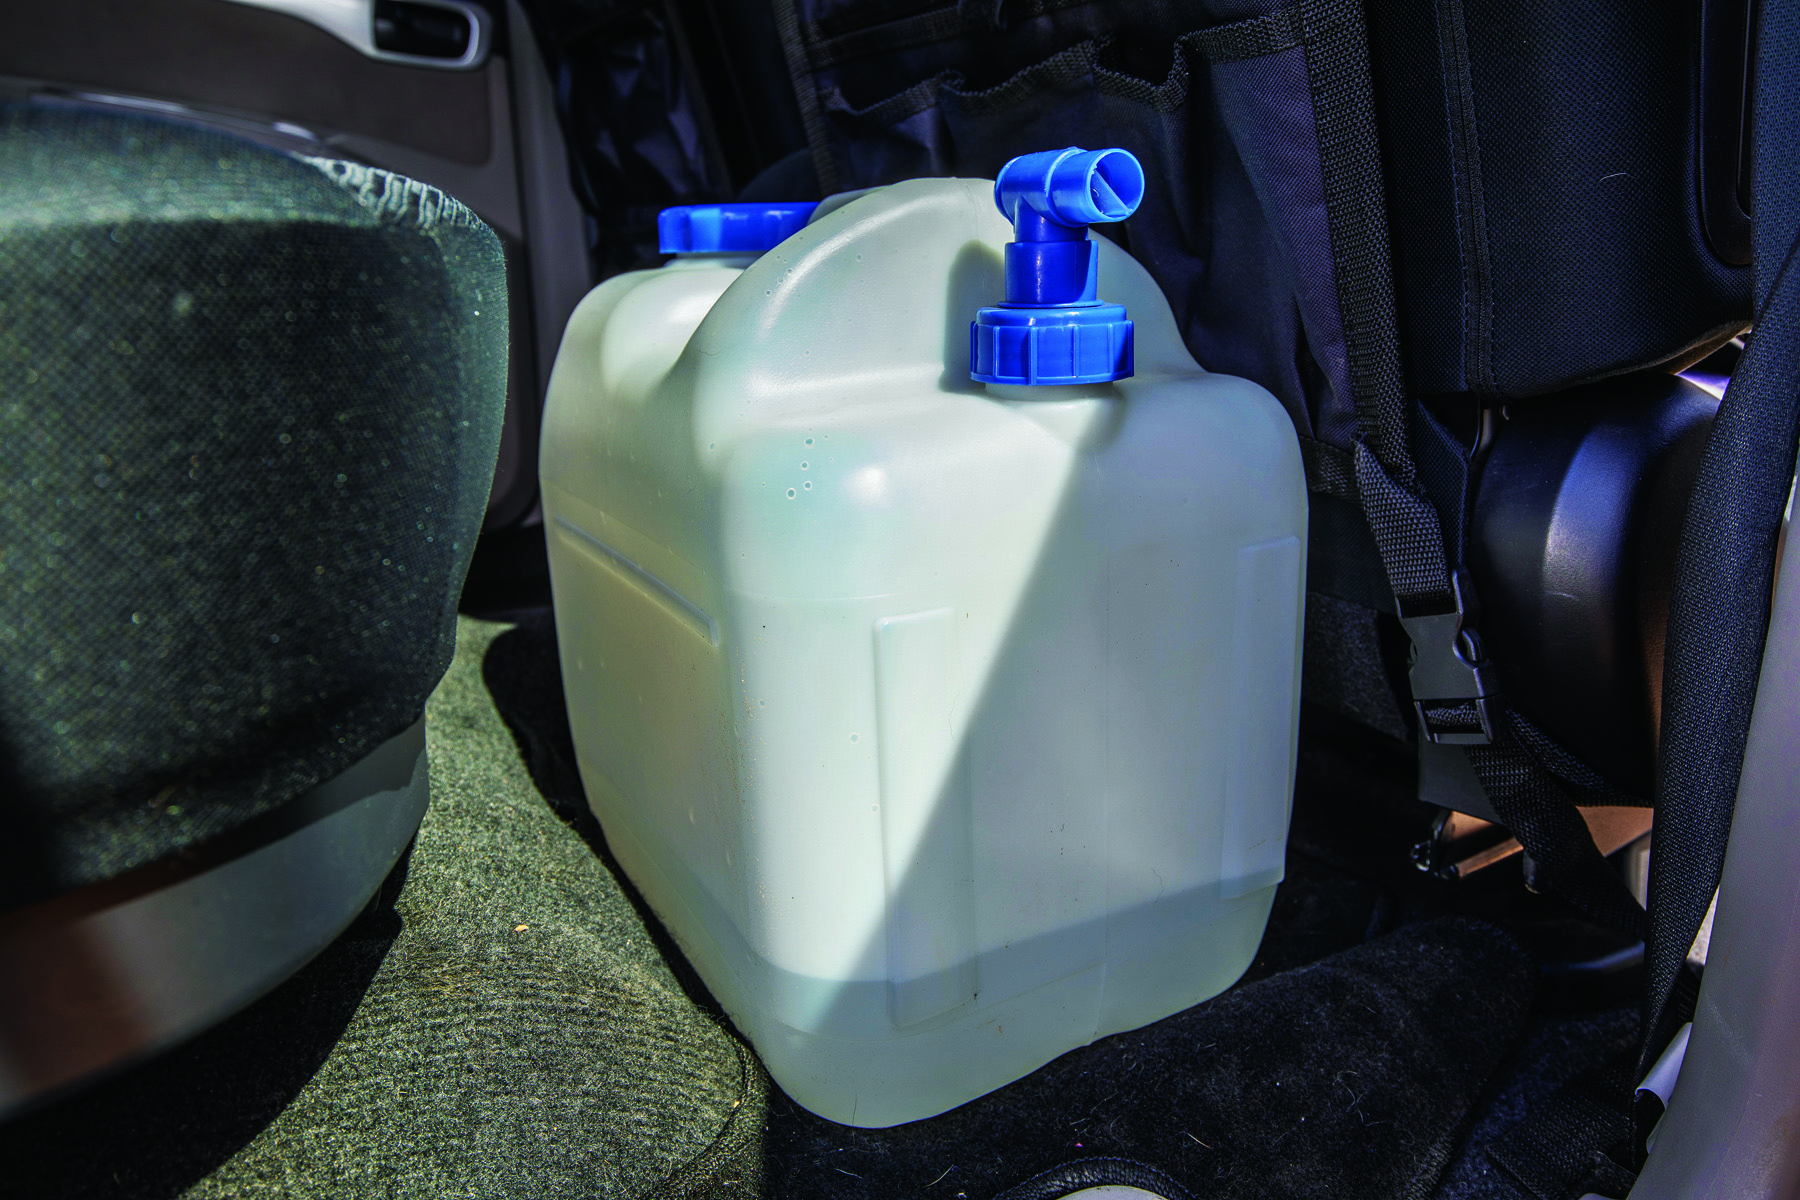
The very best setups feature an in-built water tank, which brands such as Drifta can build into their drawer systems. Perhaps regrettably, we decided against this, so right now our setup consists of a 20L water dispenser from K-mart that slots nicely into the rear footwell.
Jerry cans on a roof platform or rear bar are one way of increasing water capacity. Sadly, having swing-arms installed generally involves the installation of a new rear bar (like one by Kaymar, distributed through ARB) rather than modification of your existing tow bar. This will cost $3000–4000. Brands like MCC and custom fabrication brands like Raslarr Engineering and Jack Diesel & Custom Fabrication are also worth enquiring with.
If you have a spare tyre that travels on a boot door, you can likely buy a holder and mount a jerry can here; if not, you could theoretically use a Tyre Trek spare tyre carrier, stocked at TJM. They slot into your hitch, can have jerry can holders added to them and have swing-arms so you can clear the space to open your boot. You’d pay over $1500 for this solution.
External jerries are also useful for increasing fuel capacity, as are auxiliary and replacement fuel tanks. Each vehicle differs when it comes to these; options to extend the Challenger’s standard 65L include auxiliary tanks made by Long Ranger or Long Range Automotive, or a replacement tank by Brown Davis.
The Brown Davis tank adds 50L to existing capacity and appealed most as it didn’t require the relocation of our spare tyre (a logistical nightmare) and cost around $1500 installed. However, we’ve decided against extending fuel capacity for now. Instead, we’ll plan carefully when remote.
WHAT YOU MAY NOT NEED
The most obvious exclusion for our rig was offroad tyres. We appreciate that our current highway terrains, with a modest tread pattern and moderate construction, will be more prone to punctures and offer less traction, but both of those issues can be mitigated by clever use of an ARB Ezy Tyre Deflator and TJM Compressor. Fuel economy between destinations will be better, too.
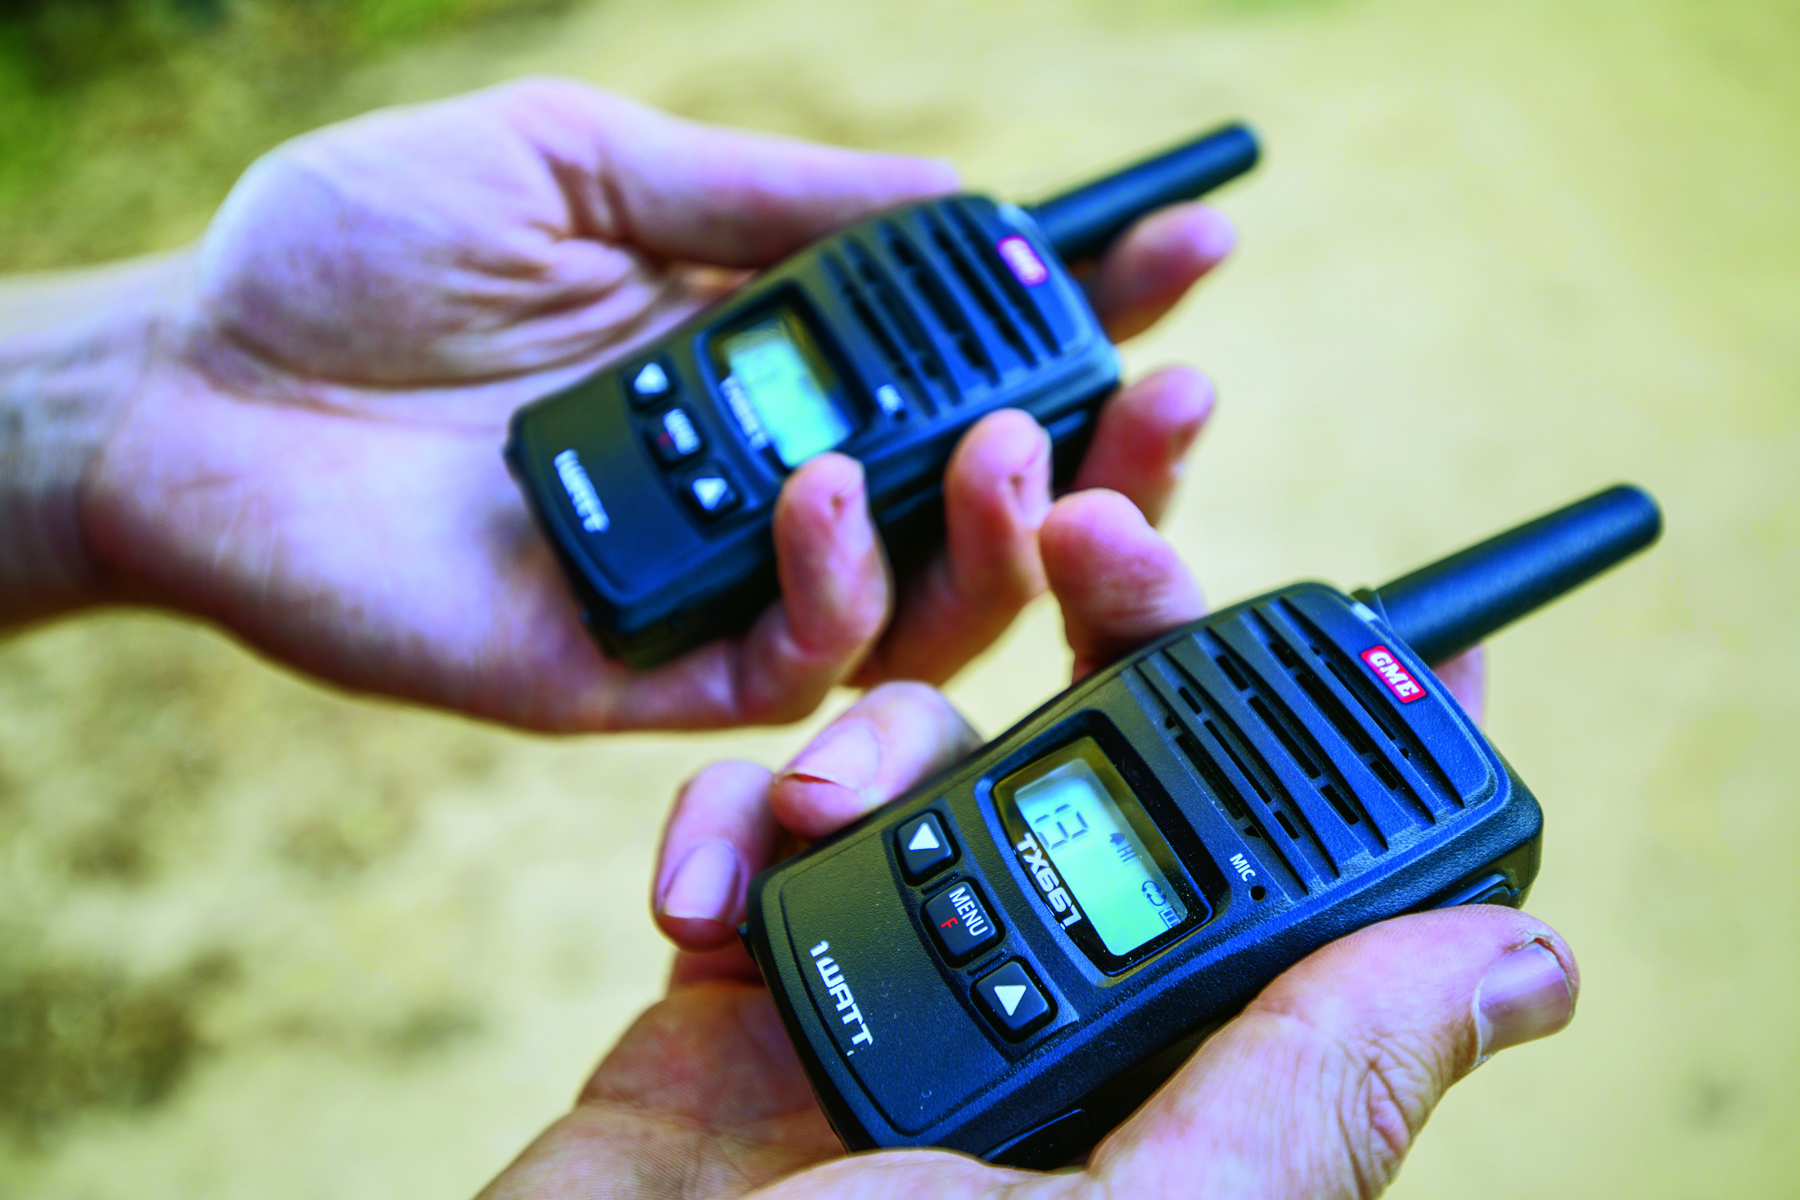
A UHF radio, spotlights and a snorkel have for now been bypassed by a set of GME handhelds, avoiding night driving in the bush, and avoiding deep water crossings. Ideally, we’d love all of these accessories, but there are so many expenses involved in doing up a 4WD that you may ultimately have to make some carefully considered exclusions.
READY TO ROLL
A few parting words of advice. Always do everything in its proper order. Many elements in a touring set-up are interrelated, so one misstep with a particular accessory can seal the fate of another. Consider approaching one brand to do a lot of the work to see if you can get better value as a big spender; but always remember, the best brands are often specialists in one field.
If hibernating is what we are being forced to do, then buckle in and take advantage of your spare time. We hope to see you rumbling out the driveway with your envy-inducing setup as soon as this travel ban ends.